Here is a simple and basic guide on how to make melt and pour soap. Pretty much every soap making recipe starts with the few steps mentioned in this post, a great help for first time soap makers…
The Crystal Melt & Pour Soap range is the success story of Stephenson Personal Care. Sold globally, Crystal Melt & Pour is used to produce some of the most innovative and aesthetically pleasing soap bars on the market.
Ideal for the craft market, because it requires little in the way of specialist equipment, customers typically need only to add colour and fragrance to achieve fantastic finished soap bars. Our Melt and Pour soap bases are also popular with large scale, automated, manufacturers wanting to produce mass market innovative soap lines to differentiate themselves from their competition.
There are a few reasons why Soap Bases have become so popular
- Easy to use
- Superior Clarity
- Requires minimal equipment/investment
- Superior aesthetics
- Versatile – enables production of intricate shapes, multiple colours and inserts
- Great fragrance lift
- High Glycerin content – skin moisturising
- Excellent Foaming and Cleansing properties
Melt and Pour soap tools
Making soap using Melt & Pour Soap Base is easy and simple, first you’ll need a little bit of equipment to get started so get together this little list of tools:
- Soap Moulds (something to pour your soap into)
- M&P Soap Base
- Cosmetic Grade fragrance
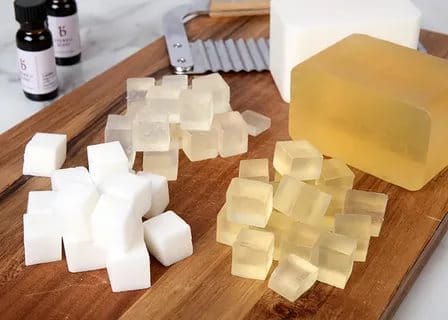
- Soap Cutter or Sharp Knife to cut soap base into cubes
- Glass bowl / Pyrex or glass measuring cup
- Spoons to Mix
- Plastic Wrap / Clingfilm
- Microwave
- Food Colouring / Cosmetic Colourings
Steps to make Melt and Pour soap
- Cut up your Soap Base into chunks, just like ice cubes.
- Weigh your soap according to the tutorial / recipe (if your following one)
- Place your soap cubes into your Pyrex measuring glass / container
- We suggest covering the top of your cup with Film (Clingfilm) wrap this helps to keep the moisture level stable
- Pop your soap base into the microwave for around 1 minute, per 500g. Just keep an eye on it!
- Stir, and gently mix the soap occasionally ensuring that all soap base is fully melted.
- Once melted feel free to add your fragrance, colour, and any other additives you wish to add.
- Mix, gently and then pour out the liquid soap base into your moulds.
- Allow the soap to set for 6-8 hours, then remove and get ready to enjoy.
We’ve added this little video to help you on your soap making journey, as you become a Soap Pro check back into our Soap Making Recipes, or sign up to our Newsletter for more interesting and technical soap making recipes and tips.
Happy Soaping!