People often say that contouring is a difficult makeup technique that only professionals should use, but that doesn’t have to be the case. If you know what you’re doing, choose your ingredients carefully and take your time, contouring can be easy, natural and even fun to do yourself.
In this blog post, we discuss what DIY contour makeup really entails, how natural contour makeup works, how homemade makeup gives you more control and how easy, flexible and confident contouring can be for beginners. You’ll also learn how to choose pigments, tools, textures and routines that suit your skin, your values and your lifestyle.
Why contouring doesn’t have to be complicated
Many people find contouring scary because it involves sharp lines, heavy products and a “made” look that doesn’t always feel natural or comfortable. But contouring is simply about creating soft shadows and light. It’s not about changing your face, but subtly emphasizing its natural shape.

That’s why more and more people are using natural contour makeup. This does not use strong contrasts, but subtle depth, skin-like textures and pigments that blend well. This method works much better for daily makeup, simple routines and sensitive skin than traditional heavy contour products.
If you apply that way of thinking to DIY contour makeup, it becomes even easier to do. You no longer have to limit yourself to one color, texture or formula. You can customize everything, like how warm, deep, soft or creamy it is, so it really suits you. Here, making cosmetics becomes a part of your beauty routine rather than a separate hobby. You don’t just apply makeup, you change how it looks on your skin.
What is DIY contour makeup?
When you make your own contour makeup, you create or alter your own contour product instead of buying a ready-made product. You can do this by mixing a mineral pigment with a cream base or by adapting a formula you already have to your skin type and undertone.
You don’t need a laboratory, advanced chemistry or expensive tools to do this. In essence, DIY contour makeup is all about making conscious choices:
- Choosing a pigment that goes well with your undertone
- Choosing a base appropriate for your skin type (dry, oily, sensitive or mature)
- Choosing a coverage that feels natural rather than heavy
This process offers you control, transparency and flexibility. This is especially useful if you care about ingredient quality, the environment or the health of your skin. DIY contour makeup also takes away the stress of getting it “right. You can change something if it feels too dark, too warm or too dry. That feeling of trying new things makes making cosmetics fun instead of stressful.
Why natural contour makeup feels better on the skin
Natural contour makeup is not just about what’s in the product, but how it feels and works on your skin throughout the day. To get sharp definition and long-lasting hold, traditional contour formulas often use strong binders, heavy waxes and highly concentrated pigments. This may look great in photos or under studio lights, but in real life it can feel heavy, dry or like a mask. Natural contour makeup is different because it focuses on finishes that look like skin, textures that let air through and softer pigment dispersion. These formulas are made to melt into the skin rather than stay on it. They also move with your facial expressions and slowly fade rather than crumble. The result is a contour effect that looks more like a natural shadow than a layer of makeup you can see. This is especially important for people with sensitive skin, those who wear makeup every day and those who want a more natural, simple look.
This method also aligns with the way people think about making cosmetics in a thoughtful way. Instead of trying to make your skin look a certain way, you work with its natural texture, complexion and properties. That’s why natural contour makeup and DIY contour makeup go together so well: they both focus on comfort, balance and personalization rather than intensity and uniformity. You can customize the undertone, depth and texture of your own contour products to make them more personal rather than generic. This not only makes it look better, but also makes you feel more comfortable and natural with makeup, which should highlight your natural beauty rather than hide it.
Contouring for beginners: start with understanding, not products
One of the biggest mistakes people make when they first start contouring is thinking about the product before learning how to do it. Contouring for beginners should always start with facial structure, light and placement, not shades or tools.
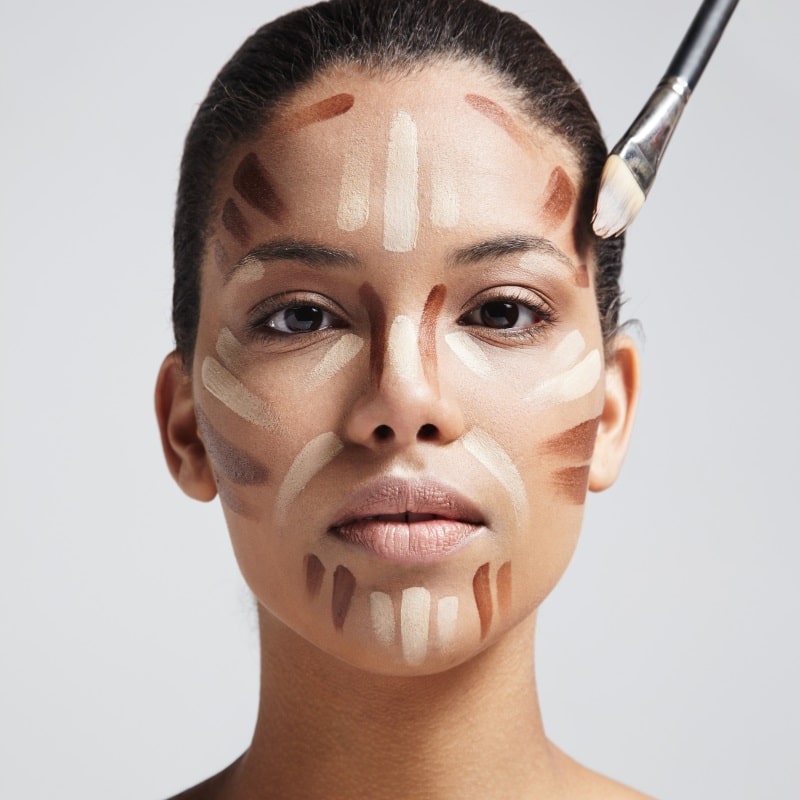
Your face already has natural shapes, such as your cheekbones, jawline, temples and nose. The goal of contouring is not to change what is already there, but to make it look better.
Take a moment to look before applying anything:
- Where the light naturally falls on your face
- Where there are already natural shadows
- How your face shape changes when you laugh or relax
This knowledge makes contouring easy instead of difficult. Choosing the right DIY contour makeup is much easier once you know how to apply it.
Choosing the right texture for your DIY contour makeup
Cream versus powder
Choosing the right texture is one of the first and most important things to do when you start using DIY contour makeup. How your contour product feels on your skin throughout the day depends on the texture, how well it blends and how natural it looks. Some textures blend with the skin and give a soft, smooth finish, while others give more texture, control and staying power. Knowing the difference between cream and powder textures will help you make better choices when creating cosmetics. It also ensures that your contouring routine really works for your skin type, lifestyle and personal preferences.
Cream Contour:
- Best suited for dry, normal or aged skin. Creamy textures add a small amount of moisture and flexibility, making them very comfortable for skin that feels tight, dry or rough. Instead of staying on the skin, they move with the skin.
- Makes the finish softer and more natural. Cream products do not stay on the skin, but melt with it. This creates a shadow effect that looks more like a natural contour than a layer of makeup.
- Easier perfect blending. If you apply too much cream contour, it won’t ruin the rest of your makeup because you can smudge it out, blur it or even lightly remove it.
Powder Contour:
- Better for oily skin or in humid environments. Powder absorbs excess oil and stays on the skin all day, making it a good choice for oily skin types or hot environments.
- Gives you more control and stays on longer. Powder textures tend to stay on longer and give you more control, which is useful if you want a slightly more defined look or if your makeup needs to stay on all day.
- Works well on top of foundation. Powder contour can easily be applied on top of solid foundation without moving the base, making it ideal for makeup routines that need more texture.
For most people starting out in contouring, cream textures are easier to use and more forgiving. They are harder to overapply, easier to tone down if something looks too strong, and more flexible if you are still learning how to blend and apply things. That’s why many people start their DIY contour makeup adventure with just a cream base and a little mineral pigment. That way you can try things out, make adjustments and learn without feeling rushed, and the look stays natural and good for your skin.
A simple DIY formula for a contour makeup base
You don’t need complicated recipes to make cosmetics at home. A simple contour base usually consists of:
- A light cream base, such as a simple lotion or balm base that has been emulsified. This carries the pigment and determines how the product feels on the skin, whether it is creamier, matte or softer. A light base makes contouring easier and makes the finish look natural rather than heavy or waxy.
- Mineral pigments are usually soft brown with a very small amount of gray or taupe. This combination works better for contouring than regular bronzer shades because it looks more like the natural shadows on the face than warmth or tan.
- You can add a little oil if you want a slightly smoother or slightly moisturized finish. This can help the contour glide more smoothly over your skin, especially if you have dry skin or like a softer blend.
Once you have these ingredients, all you have to do is mix them slowly until you have the desired depth and undertone. Start with a small amount of pigment, mix it well, test it on your skin and then make small changes. One of the best things about making cosmetics is that you can take your time and make sure the formula really suits you. You don’t have to stick to one shade or texture. That flexibility makes DIY contour makeup easy to use even for beginners. It also makes the process more creative and less stressful than a technical challenge.
Tips for natural results
- Even the best natural contour makeup can look heavy if you don’t apply and blend it correctly. The way you use the product is more important than the product itself.
- Start with a small amount and gradually add more. This way you have more control and the result remains soft.
- Do not blend downward, but upward and outward. This makes the face look more balanced and lifted.
- Go for soft transitions rather than sharp lines. The outline should take the form of a shadow, not a line.
- It is better to apply less contour first and add more later. It is easier to apply layers than to correct too much product.
Frequently asked questions about DIY contour makeup
V1. Is it safe to apply contour makeup yourself?
How you handle the ingredients and what you use them for are the most important things for safety. DIY contour makeup is very safe and often milder than highly processed commercial formulas, as long as you use cosmetic-grade pigments and bases and keep your tools and containers clean.
V2. Does natural contour makeup stay on all day?
It depends on your skin type, the base you use and where you are. Cream-based natural contour makeup may fade a little faster than powders, but it blends more naturally with the skin and is easy to touch up without disrupting the rest of your makeup.
V3. Do I need a lot of money to start making beauty products?
Not at all. For most recipes for homemade contour makeup, you only need a few simple ingredients in very small quantities. Many of these ingredients you can also use for other projects, so in the long run, making your own cosmetics at home is often cheaper than buying many ready-made products.
V4. Is it difficult to contour when I’m just starting out?
It may seem difficult at first, but contouring for beginners becomes a lot easier when you focus on subtle enhancements rather than visible sculpting. With soft textures and light application, contouring quickly becomes a natural part of makeup application rather than a technical step.
Conclusion
DIY contour makeup is less about following trends and more about understanding how products react to your skin and facial structure. When you use natural contour makeup, the goal changes from creating clear lines to adding depth that looks balanced and feels good. By making your own cosmetics, you have even more control because you can adjust the texture, tone and intensity instead of adjusting your skin to set formulas.
If you’re just starting out, it’s best to take it slow to learn contouring. It’s easier to learn and you’ll get more consistent results over time if you start with small amounts, choose forgiving textures and leave room for changes. Contouring simply becomes a flexible part of your routine if you use the right tools and take a hands-on approach. It doesn’t have to be perfect or forced.